JMCloud Connect: how can I setup Applications and Profiles?
What to know
JMCloud allows to define "Applications" that can be seen as a way to access an endpoint from the JMcloud Connect using a third-party application installed on the client side.
For example an application can be defined to simplify connection to JM4web pages exposed by an HMI,
launching the computer's default web browser with the endpoint's IP Address.
Requirements
Following requirements needs to be satisfied to follow this FAQ:
- JMCloud Connect software (Download here),
- a Superuser account to use with JMCloud Connect (Learn how-to here).
Creation of Applications and Profiles
Launch the JMCloud Connect software to get access to the JMCloud server,
in the Login page enter Username and Password, then click on the SIGN IN button.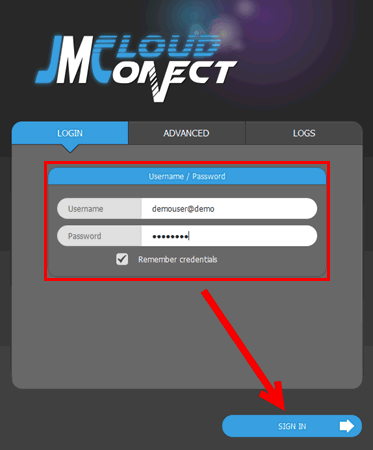
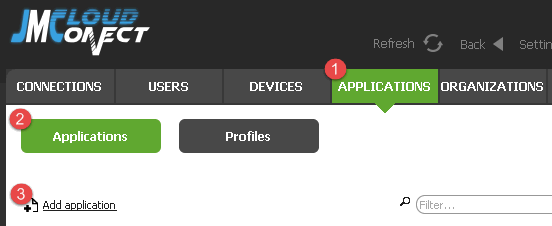
Once connected select the APPLICATIONS tab (1), then select "Applications" (2) and finally click on "Add application" (3)
to add a new application.
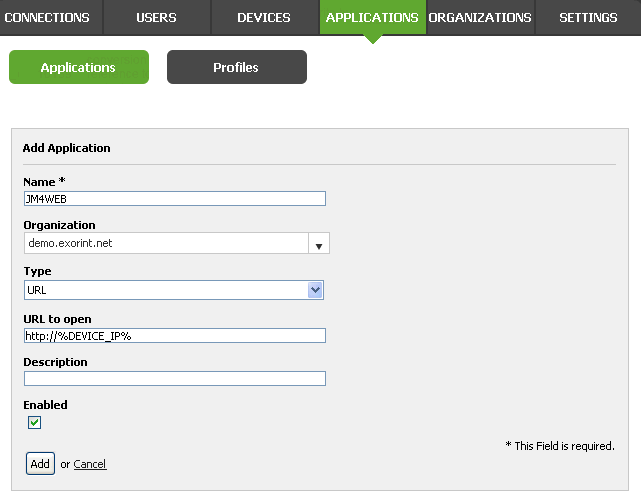
Into "Add Application" page, define:
- Application Name,
- Organization,
- Type:
- URL, then "URL to open",
- Program, then "Command path" and "Command args",
- Description,
then save with click on [Add] button.
The Application created previously, must be associated to a "Profile".
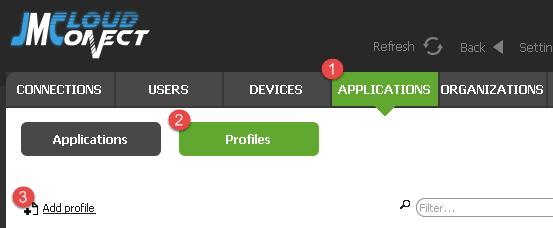
Select the APPLICATIONS (1) tab then select "Profiles" (2) and finally click on "Add profile" (3).
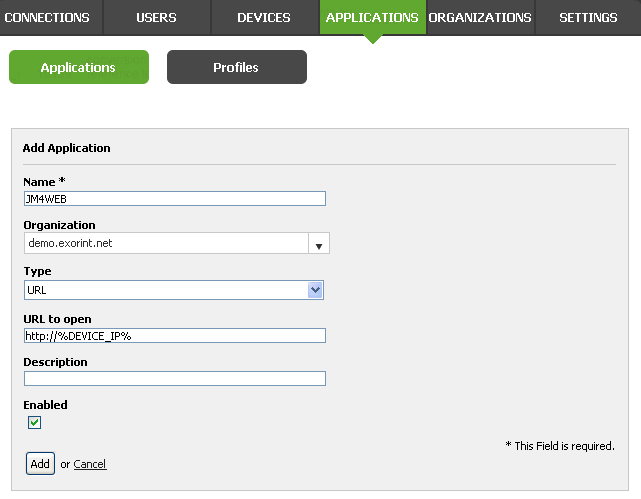
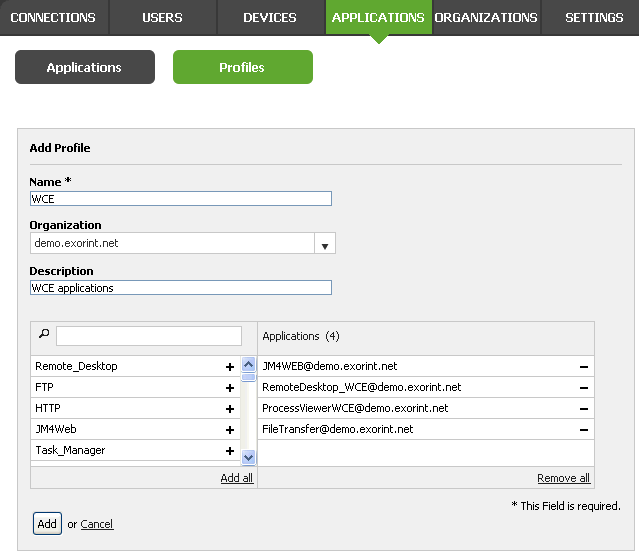
Into "Add Profile" page, define:
- Profile Name,
- Organization,
- Description,
- Select from left side application to be included into Profile,
then save with click on [Add] button.
Once defined a Profile containing needed Applications, last step is to associate the Profile to every endpoint we need to manage.
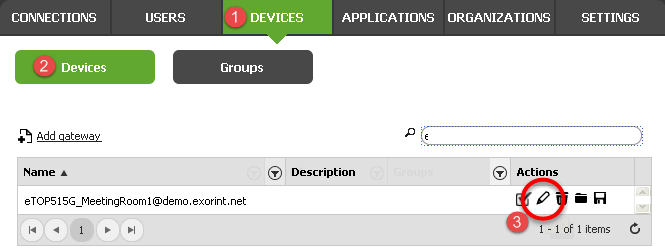
Select the DEVICES (1) tab, then select "Devices" (2), identify the gateway to edit and finally click on "edit" icon (3).
Once defined a Profile containing needed Applications, last step is to associate the Profile to every endpoint we need to manage.
Select the DEVICES (1) tab, then select "Devices" (2), identify the gateway to edit and finally click on "edit" icon (3).
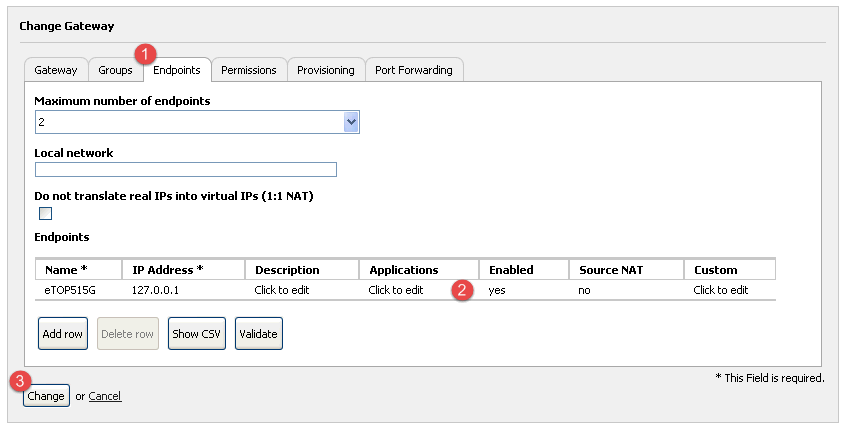
On "Change Gateway" page, select "Endpoints" tab (1) then for every endpoint is needed to apply the Profile, click on specific row (2)
and select the Profiles. At the end of editing, click on Change button (3) to apply settings.
Available URL and Programs
- HTTP Access
- Usage: connect to endpoint Web server (available for HMI as JM4Web, PLC or 3rd part devices)
- Type: URL
- URL to open: http://%DEVICE_IP% - JMobile Client
- Usage: connect to HMI (Command path could change based on your JMobile version)
- Type: Program
- Command path: %PROGRAM_PATH%\Exor\JMobile Suite 2.0\runtime\Client_WIN32\hmiclient.exe
- Command args: %DEVICE_IP% - HMI Remote Control
- Usage: connect to HMI like Remote Desktop (Remote Control must be anabled on HMI Cloud Enabler)
- Type: URL
- URL to open: BUILTIN_APP?app=WCE%20Remote%20Desktop&endpoint=%DEVICE_IP% - HMI Task Manager
- Usage: show current processes, cpu and ram usage on HMI
- Type: URL
- URL to open: BUILTIN_APP?app=WCE%20Remote%20Process%20Status&endpoint=%DEVICE_IP% - Integrated FTP Client
- Usage: connect to endpoint FTP server (available for HMI, PLC or 3rd part devices)
- Type: URL
- URL to open: BUILTIN_APP?app=FTP&endpoint=%DEVICE_IP% - TightVNC Client (Require TightVNC installed on Computer running JMCloud Connect)
- Usage: connect to endpoint VNC Server (available for HMI, PLC or 3rd part devices)
- Type: Program
- Command path: %PROGRAM_PATH%\TightVNC\tvnviewer.exe
- Command args: -host=%DEVICE_IP% -port=5900 - Windows Remote Desktop
- Usage: connect to endpoint via Remote Desktop (available for Windows PC only)
- Type: Program
- Command path: %SYSTEM_ROOT%\system32\mstsc.exe
- Command args: /v:%DEVICE_IP%:3389 - HTTPS Access
- Usage: connect to endpoint Web server via SSL (available for PLC or 3rd part devices)
- Type: URL
- URL to open: https://%DEVICE_IP%


